Showing posts with label crafty-homemaker. Show all posts

Monday, July 29, 2013

A Swarm of Butterflies

On one of my many excursions into the world of Pinterest I stumbled upon this pin, of a gorgeous butterfly mobile. When I looked for more such pins there appeared to be a small market on Etsy for such cute creations, though the price tags left a lot to be desired. So I decided I could and would DIY-it!

I found a paper cutter with a gorgeous butterfly design in Lincraft for $25. I also bought an embroidery hoop for $3 to form the base of the mobil. I decided I would use paint swatches so that I could create an ombre effect. I collected A LOT of paint swatches from various hardware stores around our area (& I mean A LOT)! And I began punching out the butterfly stencils. This was far harder than I had anticipated and left me with a really sore wrist. I also had not thought through the fact that the back of the paint swatch has printing all over it.

So I gathered even more paint swatches and cut out even more butterflies and decided I would stick two cut-outs together for each butterfly on the mobil. This also helped with gluing the butterflies to the fishing line as it formed a sandwich around the line.


Unfortunately my husband was working some extraordinarily long hours and so I had many hours to spend cutting and gluing butterflies to fishing line and hanging the strands to dry on the clothes hoist. I used ribbon from my ribbon-vase to hide the embroidery hoop and wire, tied some tule to the top and it was ready to hang in Kyah's room.

I really love the little hints of pink that are featuring in the beautiful orange nursery we created for her. I love this delicate  mobil that hangs between her cot and her changing table so she can enjoy it in both places. And I really loved making this little craft project for her.

Do you want one? I will make you one far cheaper than the $70-$100 I saw them advertised on Etsy for. For full DIY instructions see this pin.


Monday, July 8, 2013

Hand Made Gift Wrap

In our family there are a flurry of birthdays from May through till August. With so much gift giving, there comes a need for much gift wrapping, and I took the opportunity to let the kids do a little craft. (plus it provided half an hour of entertainment - perfect when I needed to sit down and feed the baby). The hand painted wrap by Beau at Christmas was a lot of fun, but Noah is loving his new-learned writing skills and so we decided on crayons and pencils for this round of DIY-gift-wrap.

There was name writing, hand and foot tracing and Octonaut drawing. Even ambidextrous colouring at one point. It was all alot of fun. The boys were very proud of all their colouring and writing.

The presents looked great and were enthusiastically received by all the birthday people. I believe this wrapping has even been recycled as a wall hanging in my nephews nursery!

Have you done any fun craft activities with the kids laterly?

Tuesday, May 28, 2013

Adorable Long Tail Baby Bonnet


Towards the end of my pregnancy, when my ankles had been renamed "cankles" and my feet no longer fitted into anything other than thongs, I stumbled upon this pin for an adorable baby beanie. I had wool, I had the right size needles, and hubby was taking care of the boys. 

I took up knitting after my first son was born, and whilst I have had spurts of productiveness, I have not managed to make a regular habit of knitting. I completed a scarf for Noah when he was one, and I have the completed pieces of a jumper for him, which I am still to sew together. The jumper is sized for an 18month old.  Noah is now 4...

Maybe Kyah will be the one to wear that jumper...

For this knitting project the wool I had on hand wasn't exactly the colours you would imagine for a newborn baby, no pastels or baby blues. But I was not about to drag my cankles around the shops to find something more "baby appropriate". Plus I love this wool! I had begun to knit a scarf in it, but that was going to take years, so I unravelled that and commenced operation baby beanie.  I was secretly hoping knitting would help induce labour. It didn't.

The hat took me 2 days. I had to undo it and restart after completing 50 rows because I didn't understand the shorthand pattern. However, when I read the comments below the pattern it appeared many people had the same problem, and someone had been kind enough to write the pattern out long hand for us novices!

Voila! Gorgeous hat. I even made another for a girlfriend who is expecting her 4th baby - the second time around it only took me 1 day to knit the beanie!

Whilst I waited for baby to arrive to wear the beanie, I had a few other willing models.

When she did finally bless us with her arrival, Kyah was more than happy to pose in her new hat.

The pattern:
(as I followed it)
Using size 7 needles, cast on 66 stitches.
Work 1x1 rib for 6 rounds
Switch to size 8 needles, work stockinette c/ stripe for 1 3/4"
Rnd 1: *K9. K2tog. Rep from * to end of round. 
Rnd 2: K. 
Rnd 3: *K8. K2tog. Rep from * to end of round. 
Rnd 4: K. 
Rnd 5: *K7. K2tog. Rep from * to end of round. 
Rnd 6: K. 
Rnd 7: *K6. K2tog. Rep from * to end of round. 
Rnd 8: K. 
Rnd 9: *K5. K2tog. Rep from * to end of round. (There are now 6 stitches per decrease) 
Rnds 10-14: K. 
Rnd 15: *K4. K2tog. Rep from * to end of round. 
Rnds 16-20: K. 
Rnd 21: *K3. K2tog. Rep from * to end of round. 
Rnds 22-32: K. 
Rnd 33: *K2. K2tog. Rep from * to end of round. 
Rnds 34-44: K. 
Rnd 45: *K1. K2tog. Rep from * to end of round. (If you cast on 66 stitches, there are now 6 stitches left) 
Rnds 46-56: K. 
Rnd 47: *K2tog. Rep from * to end of round. (If you cast on 66 stitches, there are now 3 stitches left) 
Rnds 48-58: K. 
Last section will be 3sts total, easier to K as icord. End of tail is braid with knotted end & tassel 

There definitely is something very satisfying about knitting something from scratch and having your child wear it!

What do you love to create? Knit? Sew? Do you have a favourite baby pattern to share?

P.S. There was some concern on other blogs that this beanie is dangerous. It should only be used/worn for photographic purposes and under constant supervision by an adult.

Wednesday, April 3, 2013

Easter Activities

A couple of weeks before Easter my big boy and I set out to decorate some eggs for Easter. I had of course been madly pinning lots of ideas for egg decorating on Pinterest, but in the end we returned to the old favorite of silk-dyed eggs. These looked so spectacular last time I did them, and I knew Noah would love watching the colors transfer onto the eggs. I had a willing egg-blower and we enjoyed some scrambled eggs for lunch after this activity. We had fun wrapping the eggs in the silk ties and Noah even assigned names to each of the eggs.

Whilst we waited for the silk eggs to boil, we attempted to melt crayon shavings onto hot eggs. Unfortunately, we had limited success, with large globs of melted crayon forming on the eggs. So we decided to just scribble different crayon colors onto the hot eggs instead. A much more pleasing result.

Together with the eggs the boys proudly painted with their Nan, we had a nice Easter display for our entrance table.

A few days later, my little boy and I made some Easter sticker garlands. Basically we stuck Easter stickers onto a piece of embroidery wool and then strung the garlands up over the boys door and on the bookshelf. They were super easy, and quick - ideal for keeping the attention on a 2 year old. They are small and unobtrusive, but added a little Easter spirit to our house along with the boys' Easter hats which they decorated at preschool.

With Baby No. 3 arriving just before Easter I was glad we managed a few Easter crafts before her arrival, as Easter was celebrated amidst the fog of having a newborn in the house.

Friday, February 22, 2013

Nursery New

Although this is Baby #3 for us, this is the first time we have been able to decorate a nursery knowing that we are staying in the same place for longer than a few months after the babies arrival. We did know when we started renovating that we were expecting another baby and so we planned out the nursery and painted it natural white with a feature wall of Periglacial Blue.


It was a nice color, but the longer we lived with it (mainly as a storage room over the last few months) the more it seemed a bit washed out and depressing, looking more and more grey. So on the wet Australia Day weekend, at 7 months pregnant, we repainted the nursery. I had started washing all my baby linen and discovered that due to never knowing the gender of our babies, we had bought orange nursery bedding. So was born the colour of the new nursery - Tangella.


Vibrant, rich and stimulating. We painted the blue wall white, and decided to paint the orange wall behind where the cot would be. The addition of the Walltat we were given after baby #2 arrived and the nursery was beginning to look much brighter and happier. It was especially cute that our number 2 baby was helping us put the Walltat up since it was originally gifted to him by his aunt after he was born.

We finally had wardrobes installed a couple of weeks ago after over 5 months of living out of packing boxes and clothes racks. What a difference wardrobes have made for me!! We also had a bookcase built in the nursery at the same time due to a strange design feature in the shape of the room. It was perfect except for the hundreds of holes up and down the panels to make the shelving adjustable. It really ruined the aesthetics of this feature in the nursery. My Sister-in-law and my Dad both suggested covering the panels with either paper or contact to cover the holes. After some hunting around specialty paper shops and scrap booking materials, we settled on an adorable, but fairly neutral paper with just a hint of orange to tie it into our nursery theme. I was planning to glue the paper to the bookcase, but I decided that would be difficult to remove at a later date when the baby grows up, or if we switch the boys rooms around and need a decor change. I sticky taped the A4 sheets of paper together on the reverse side to form a long panel, and trimmed the edges to the correct width (since nothing in our house appears to be straight or square this was a little challenging). I used a couple of 3M poster strips at the top of the panel and just insert the shelf tacks through the paper to keep it taught. It worked a treat.

Now it was time for some nursery art inspiration (thank you Pinterest once again). I love all the alphabet and number nursery art, but not necessarily the price tag. So I created my own in Pages using colours that tied into our orange-white-chocolate theme that was emerging in the nursery. I already had some chocolate frames I had previously used in the boys playroom which needed to be put to good use. I am pretty happy with the result and the printing at Officeworks cost me 75c for each art work. Bargin! The frames look lovely on the new bookcase.

Whilst I was gaining inspiration for the alphabet and number art I came across the idea/pin of using animal silhouettes for nursery art. I really liked this idea, especially as the paper lining the bookcase was animal themed with elephants, giraffes, bears and rabbits. After gathering a large number of silhouettes of different animals - giraffes, elephants and owls - we decided on baby elephants for the nursery. My favourite animal! I traced the silhouettes onto scrapbook paper and cut out the shapes before pasting this onto left over paper from the bookcase lining. This really ties the nursery colours and prints together.

These two artworks ended up being a little more expensive than the alphabet and number prints - $1.10 for each of the background prints and the scrapbook paper came in a book of about 50 papers for $6.00. So these cost about $1.11 each to make, plus a little glue. I'm still counting that as a bargin!

With all the baby clothes and linens washed and folded into the new wardrobe and after assembling the bassinet with the help of the two big brothers we are all just waiting for Number 3 to arrive now.


Thursday, February 14, 2013

Valentines Visions

Today is Valentines Day. This dawned on me yesterday around midday whilst I was perusing Pinterest (of course!). Nathan and I have never really celebrated Valentines Day as our wedding anniversary is only 11 days away. But it does mark the day that Nathan confessed his love for me all of 13 years ago. I came home from work to a huge bouquet of red roses, a teddy bear, and chocolates. The card read "I know this day is a crock, but even friends deserve to get flowers." Then after ice-cream in Manly Nathan delivered an on-the-run-confession of his feelings for me as he stepped out of my car and ran inside to go to his night job packing shelves at Woolworths. Romantic!

I was struck this year that it would be nice to give Nathan something to tell him how much I love him. Maybe because we are about to have our third baby. Maybe because he is coping without complaint with a hormonal-stressed-nesting-uncomfortable-irritable-anxious-about-to-have-another-baby wife. But I also didn't want to spend $100 when we will celebrate our wedding anniversary in under 2 weeks.

Pinterest to the rescue once more with a little inspiration and I created a little expression of love to present to Nathan this morning that was both heartfelt and oh-so-appropriate. It was important to me that I give it to him as soon as we woke up, because every morning my wonderful husband takes our two boys out with him to buy coffee to bring home to me in bed. He not only gives me a sleep in every day, he brings me coffee AND spends quality time with our boys. Also the other day I found myself saying to Nathan as he suggested he wasn't going out for coffee that day, "Coffee in the morning makes me a better mother to our children." So you can understand the sentimental value behind this little gift.

Using Pages I created this little graphic (I am loving using Pages for all types of graphic and art work creations for the Nursery - more on that here).
I printed the image out as a photo at Officeworks and bought a little frame for it, added some scrapbooking paper as a little border of colour. And I had a cute little Valentines gift without eating into my wedding anniversary budget.


Today the coffee was accompanied by a beautiful box of Guellen's chocolate truffles! It is a great Valentines Day indeed!

Wednesday, January 30, 2013

Playroom Make Over Take 1

When we moved into our new house, all the boys toys ended up dumped in what was to be their playroom. The shelves stayed where the removalists' had unloaded them and we stacked the toys away accordingly. It really was not a pretty picture, nor a practical one. The playroom is long and skinny and everything ended up stacked on the sides diminishing the width further and reducing the play area significantly. Toys usually ended up everywhere on the floor, leaving no room for the boys to stand or sit, let alone play. Also with only low lying shelves, there was nowhere to put precious items out of reach of our 2 year old "destructo baby" (as his brother calls him). And nowhere to put pencils and crayons out of reach of either of the boys, leading to some wall drawing just weeks after completing our full house repaint!

I needed some solutions to combat this clutter! So began my Pinterest mission to find playroom storage solutions that were attractive, functional and didn't break the bank (the kitchen renovation had already done that!).

We decided on some floating shelves for the "unreachables" we wanted to keep away from "destructo". We found these at Bunnings for $18.90 each and they function well to keep items visually available in the playroom so that my elder boy can ask to play with them when he wants, but out of reach of those little destructive and mischievous hands. They also display some of the art work we have for the playroom.

Next I wanted to de-clutter the red retro play kitchen Noah was given by Santa a couple of years ago. It has always been so jam-packed with food, saucepans, crockery and cutlery that the kids have struggled to use the kitchen itself as anything more than a pantry. I saw this pin, using an old plate shelf to store some of these items for a play kitchen and thought that would be a great solution. But the only plate shelves I could find were in the vicinity of $80-$100. However, IKEA sells spice racks for $2.49, and I have seen many pins using these in kids play spaces. Even better, a quick coat of paint and the spice racks are customized to your decor.

Commence operation find and decorate spice racks:
It took 2 trips to IKEA to purchase them - apparently spice racks at $2.49 are hot items at IKEA.
A trip to the hardware for a can of spray paint.
A quick undercoat (just what we had left over from our house repainting)
A coat of spray paint and we had beautiful glossy shelves ready for installation.
A late night hammer and drill session (I am sure our neighbours hate us)

Voila! Cute retro red spice rack/shelving for the play kitchen. We also removed the door to the playroom (it just took up space and was never closed anyway because there were too many toys stacked up in front of it), moved the kitchen to where the door previously was, and moved the heavy Expedit IKEA shelves to the back wall to open up the play space a little more.

We added a couple of IKEA Grundtal rails ($4.99), some Bygel Containers ($1.99) and hooks ($1.49)  under the spice shelves to hang the pots and pans off (apparently this is a design feature my husband is disappointed did not make it into our own kitchen renovation) and collect the cutlery.

The verdict?
We have some happy little chefs cooking up a storm in their new space. And for $37.36 we have avoided breaking the bank with this kitchen renovation!

We still have a couple of new book shelves and magnet boards to put up in the playroom to help further with the decluttering and organization. Hopefully that happens over the coming weekend.


Monday, December 17, 2012

Hand Painted Christmas Wrap

Once again Pinterest has inspired a craft project with my kids. I saw this pin for graffiti gift wrap created by the blogger's kids. I was impressed the blogger had let her kids undertake this craft activity in what appeared to be the living room of their house or apartment in Dallas-Fort Worth. Seeing how my son painted himself as much as the paper - not to mention me, the exterior wall on the house, balcony railing, outdoor plastic furniture and the window - I was certainly glad to have a backyard for this project!

And what fun we had! Once I had convinced Beau I really did want him to paint the large roll of paper on the ground (he seemed surprisingly reluctant to put brush to paint to paper...?), he dove in and started painting and splogging away. Then he accidentally painted my arm, and all attention was off the paper and onto painting himself! And everything in the vicinity! Thank goodness for washable finger paints!

But with Beau's splogges and finger painting, a few stars and spirals from me, we had some pretty great looking gift wrap paintings. (It just got too messy to photograph during the red painting)!

Whilst Beau took his nap these sheets of art turned into Christmas wrapping! Merry Christmas!!


I wonder whose doorstep these presents will arrive on...?

Friday, November 23, 2012

Thanksgiving Crafts

We like to continue the American celebration of Thanksgiving back home Down Under. With 2 little American boys it is nice to keep a few American traditions alive for them. And we are loving any excuse to have people over for a meal cooked out of our new kitchen!

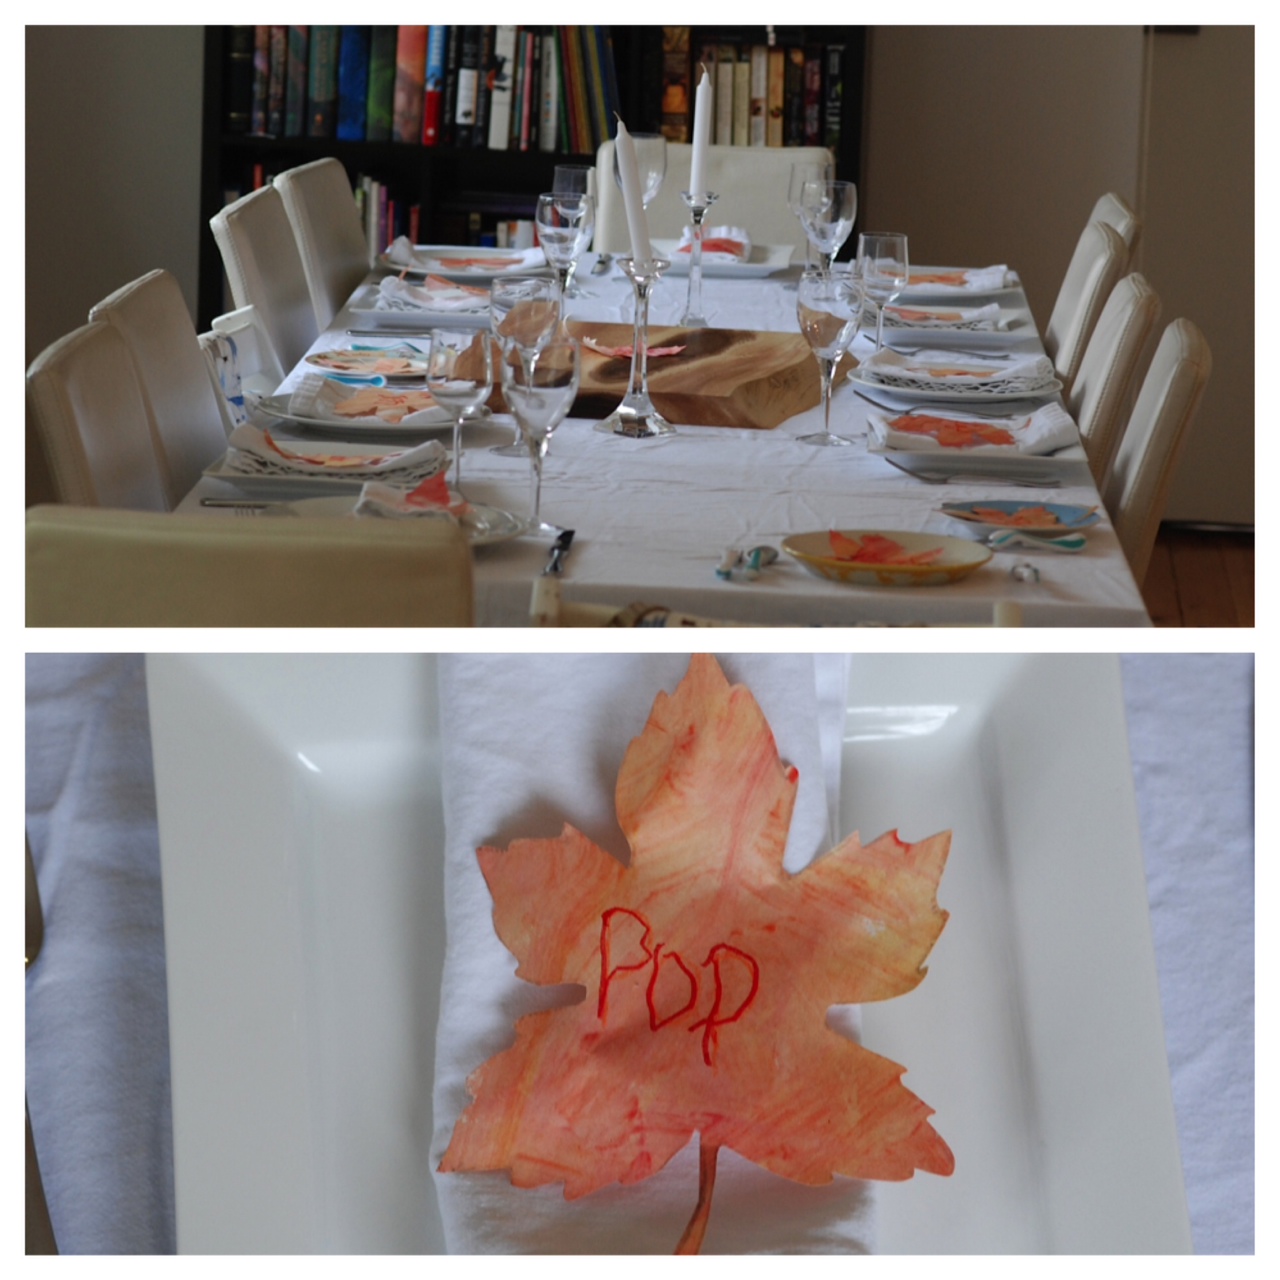
So began a 4 day cooking extravaganza! But more on the actual cooking festivities at a later date. I also wanted to decorate the table with something "Thanksgiving themed", and whilst Pinterest in always ripe for inspiration, it can also be a little overwhelming with all the ideas and choices. Then I saw this pin and thought writing on maple leaves is an achievable and tasteful table decoration. The only problem being that we don't have fall-coloured maple leaves here in Australia in late spring! But I think we came up with an even better solution.
What fun the boys had painting and finger-painting on their easel. I have to admit this is a craft activity I am not very good at doing on a regular, or even irregular, basis. I do struggle with the containment of mess, or lack thereof, and the clean up associated with painting. But after talking with my sister recently about "just having to roll with it sometimes" I decided I need to embrace the mess of 2 little boys a little more widely (especially as there is 3rd little mess-maker on his-her way). This activity certainly helped me do that! But it was actually an easier clean up than I anticipated - everyone just went in the shower.

After the paintings dried we cut them into maple leaf shapes and Noah was so excited to be able to show off his improving writing skills by writing each of our guests names on the leaves! He even asked, "Do you think everyone will fall over in surprise when they see my good writing?" Bless!
It was a simple Thanksgiving table, but the maple leaves added some color, some fall-spiration to the table, and most importantly, a bragging point for Noah to talk about his writing! Everyone loved them and took them home with them as a little Thanksgiving momento!
Happy Thanksgiving!

Friday, May 18, 2012

Pinterest DIY Fail

Well it was bound to happen. I attempted another DIY project inspired by Pinterest and it was a flop. I saw these cute painted vases and jars on Pinterest a few months ago, and after my success with the twine wrapped vases I was was keen for more cute vases. And I had heaps of paint left in the sample pots from the previous DIY project.

So I gathered together a few vessels of varying sizes - a vegemite jar, a pasta sauce jar, a wine bottle. And I set to work swirling paint around in the jars and setting them to rest. They looked spectacular.


However, this is when I encountered my first problem - 2 days later the jars were still wet. And the paint appeared to be sliding down the glass and leaving large streaks. So I re-swirled and set them to dry again. 

Fast forward 2 days - same problem. So I examined the "pins" which had inspired me and read a little more about what others had done. The first set of instructions - which I had followed suggested it was as easy as "pouring a dollop of paint into the bottle gradually rotate/swirl the paint inside until the paint coats the entire interior. Some may need two coats. Dry on a damp or plastic dropsheet. And voila! "

This however was not the consensus with the other pins. There were suggestions of surface conditioner, draining the vases upside-down on damp paper towel for a few hours before turning them on their sides to dry for 48 hours. Well it was too late for surface conditioner but I did drain the vases upside down and then turn them onto their sides to dry. This method at least got the paint to dry, but it did not solve my problem of streaks.

None-the-less it was time for my sister's baby shower and I wanted to use the jars as vases. They looked cute, even with the streaks. But after the shower had finished I ran into my final problem. The paint had bubbled off the glass completely and was floating in the water. The flowers were looking a little worse for wear. Thats when I read the final piece of advise from the "pins" I had seen on Pinterest. "Remember these are only for DECOR. Don't drink out of them, heck... I wouldn't even put water in mine. I'm simply sitting them on the shelf."


But it was not a complete failure. The vases did look cute for the baby shower even if I had to throw them out at the end. They attracted a few comments and praise - though the twine-wrapped-vases were the real stars. 


[I have to say that I clearly didn't take any photos which showed up the streaks and flaws in the little jar-vases - they still look pretty cute in all these photos.]

What DIY failures have you encountered?

Monday, April 23, 2012

One Persons Trash...

...Is Another Persons Treasure!


Whilst I recently read an article about the "crazy phenomenon [that]... devoted mothers get on Pinterest" and how really all our children want is for us to be present and loving. I totally agree.

But I also know I am a Pinterest-addict. And every now and then I find something amongst the 1000's of items I "pin" which gives me an activity to share with my family. So yes, once again Pinterest has given me craft-inspiration. Of course, I saw this idea months ago, but I finally took action a few weeks ago and tackled this project. All that I needed was some empty bottles, kitchen string, PVC glue, and some sample pots of paint which I picked up at the Hardware. The best part of the project, was having my little helper paint the bottles!

I used a wine bottle, a beer bottle and an olive oil bottle so that I had "vases" of varying sizes and shapes. And I chose to paint them in 3 different colours as I was thinking about using them for my sister's baby sprinkle next month.


It was a quick and easy project (though truthfully I stretched it out over a number of weeks, as I took awhile to visit the hardware and then actually paint the vases). The flowers I bought to display in the vases when they were completed are cheap carnations - a flower I usually ignore and avoid, but once again Pinterest showed me they are an often overlooked flower (and so cheap!).


What do you think about the role social-media, such as Pinterest, play in our roles as Mothers? Do they make us feel inadequate because we aren't living up to the ideals we see there? Or are you a fan/addict?


- Posted using BlogPress from my iPhone

Tuesday, April 10, 2012

Easter Egg Arts & Hunts

Nothing like a festive holiday to get the crafty-homemaker blood pumping. And with Pinterest ever at the ready to inspire, there were literally 100's of ideas to ... be overwhelmed by. Hence, after such a good effort last year with my silk-tie-dyed-eggs, this year I didn't decorate even a 1!

But thats not to say I didn't get a little crafty this Easter. It just all culminated on Saturday night when the Easter Bunny was a knocking. I was so excited for my 3 year old to have a great Easter after a rather dismal Christmas which ended with a 2 day hospital stay and a severe case of scarlet fever for him. Noah was very excited about the Easter Bunny, about the special treats he may leave him and about Daddy being home from work for 4 days! (We were all pretty excited about that last one)!

So once "the children were all tucked snug in their beds, while visions of sugar-plums danced in their heads" we got to work. Hiding easter eggs, writing Easter messages from the Bunny himself, eating carrots and spilling cups of water. We also hid a new Veggietales DVD about Easter. But best of all was the "Magic-powder-foot-prints" trail left by the Easter Bunny as he hoped all over the house.


In true form, the boys were up before 5am! We woke up Aunty Jess, who I am sure was having 2nd thoughts about her decision to sleep over, and we went on our Easter hunt in the grey light of dawn. Magic!


A trip to church, an afternoon nap, and then it was Round #2 at cousin Elliot's house. More eggs, chickens, rabbits, and even a few books and musical shakers mixed in there too. How spoilt the boys all were by the Easter Bunny!